KERBEROS.IO is a fantastic open source DIY video recording and monitoring solution. The default Raspberry Pi Setup only supports a single camera. Recently Kerberos.io introduced a docker option and now you can install multiple instances of Kerberos.io with docker and have as many cameras as you want.
The documentation for installing the Kerberos docker images kinda assumes you already know how to get Docker onto your Raspberry Pi and doesn’t really start from ground zero. Follow along below if you need the background steps to get up and running. You will need some basic knowledge of networking and SSH.
- Head over to raspberrypi.org and download the RASPBIAN STRETCH LITE image.
- Follow the Rasbian install guide to install the Image to your Raspberry Pi SD card.
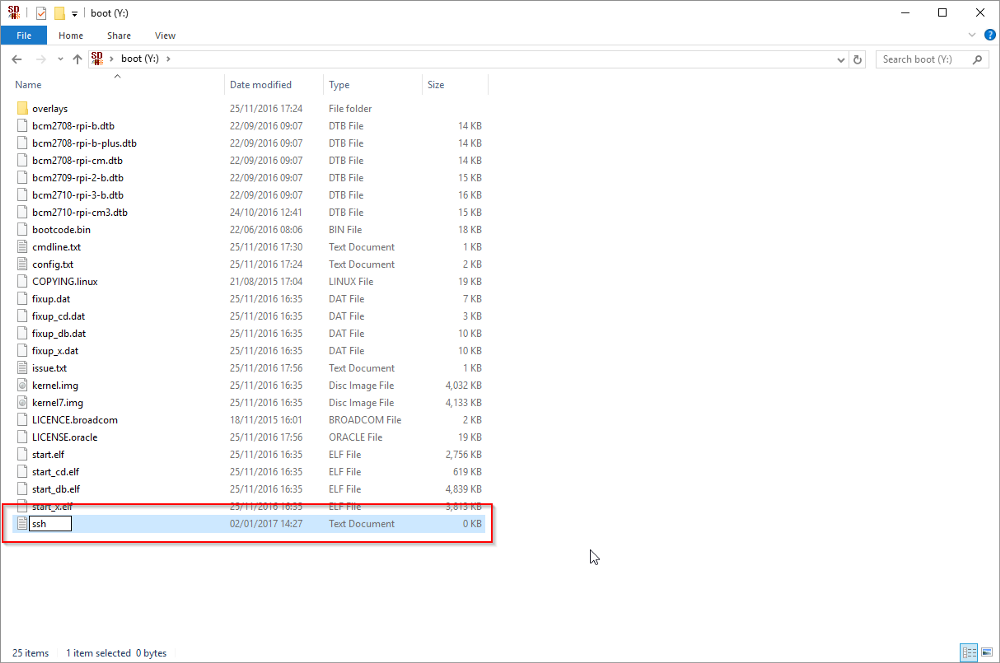
- Before you take the card out of your computer and stick it in the Raspberry Pi you need to open the boot directory of the SSD you just imaged on your computer and add a blank text file named “ssh” to the root folder. No file extension just “ssh”. More detailed guide here.

- Chuck the SD card in the RPI and boot it up
- Make sure you know what the IP for your RPI is (you’d need to find this by checking your routers DHCP table to see what IP the RPI has been assigned, or by actually watching the logs by plugging your RPI into a monitor with HDMI while it’s booting up. As this is really basic stuff I’m not going to explain it here – if you can’t find an IP then working with an RPI is going to be a tall order.
- SSH to the RPI using the IP in step 5
Username: pi
Password: raspberry - run the following command
curl -fsSL get.docker.com -o get-docker.sh && sh get-docker.sh
- Let docker install
- Once it’s finished you can follow the instructions to add your user to the docker group if you choose. The instructions for that will already be on your screen when the install completes.
- Add your first Kerberos.io container
docker run --name camera1 -p 80:80 -p 8889:8889 -d kerberos/kerberos
- Once it’s done you will be able to access Kerberos at <<IP from step 5>> – i.e. http://192.168.1.40/
- Login and setup your camera as you normally would
- You can now install additional Kerberos containers but you need to make sure the ports don’t conflict.
docker run --name camera2 -p 81:80 -p 8890:8889 -d kerberos/kerberos
docker run --name camera3 -p 82:80 -p 8891:8889 -d kerberos/kerberos
- Pay close attention to the ports i.e. -p 81:80 -p 8890:8889 you must increment these for each additional RPI so keep track of it somewhere.
- In the example above you can access camera2 and camera3 using the following URLs
http://192.168.1.40:81
http://192.168.1.40:82 - Additionally with a Kerberos Cloud account you can have all of your different cameras send their motion detections to the cloud and access them anywhere via a browser or your phone. This also allows more complex analysis of the detections such as identifying if it’s a car, pedestrian, etc. Setup of live notifications to slack / phone / etc.
- Finally, it’s a great open source project supported by a small project team and it’s good to support people like that who are making a great product!

After 6 months of putting it off I tried again to get multiple versions of kerberos to run at the same time to record 3 different cameras. I tried many ways and each time came across a problem.I followed your tutorial to the letter and finally I got it to work.I am now recording with zones 3 ip cameras of different makes. I have 3 individual logins, but have them as apps on my phone, which is the best way to view the videos.
Hi Mike,
I’ve recently given up with Kerberos due to lack of support (I had multiple unresolved issues and couldn’t get any help from the support team – I’d get endless false positives, chew up all my cloud bandwidth in minutes and it simply was not delivering any return on investment considering the cloud offering was quite expensive. I wasted hundreds of dollars on it. I’ve gone with https://shinobi.video/ which I’ve found to be incredible. Best of all it’s free and way more customizable. I’d highly recommend it over Kerberos.
Hi Mike and V5 , thank you for your sharings, you have given me motivation to get hands on a new personal project 🙂
It would be great if you could share a little about the use cases for your camera set ups to have an idea of what it worked for and what did not work .
I am just finding about Kerberos and Shinobi and the use cases I would be interested in are :
1) Car parking in front of my home surveillance with notification when somebody is standing by, cloud storage and live streaming (Only in the last year two cars where stolen in my block).
2) School front street recording when movement detected And Ware house pre-programmed recording for gymnastics trainings (local storage only)
3) Small restricted access warehouse surveillance when movement detected (with cloud storage)
We run a gymnastics bussiness (Twisters GDL) in Guadalajara Mexico and have some basic experience with thinkering (docker, balena) 🙂
(E-mail oscarjavier.mx@gmail.com)
Hope I can share more of my experiences with testing these technologies soon and to hear back from you..
Cheers!